Wednesday, 4 January 2017

VMware vSphere Client Login Error (The type initializer for ‘VirtualInfrastructure.Utils.ClientsXml’ threw and exception).

Or, getting error while login in vSphere Client (The type initializer for ‘VirtualInfrastructure.Utils.ClientsXml’ threw and exception).

Error Message Screenshot (How it looks like):


Solution/Workaround (Worked for me):

1. Reinstall vSphere Client
2. Recreate your Windows User Profile.

Updated: 08/03/2017

See AlsoHow to delete windows users profile?

Cheers!!

Friday, 30 December 2016

Creating and configuring new VLANs in CISCO UCS Blade chassis and associating to VMware vSphere Port Groups.

Or, How to create and configure new VLANs in CISCO UCS Blade Chassis?
Or, How to create new VLAN and Virtual Network Port Group in VMware vSphere?

Descriptions:  This article will guide you to create and configure new VLANs in CISCO UCS Blade Chassis and associating that to VMWare vSphere port groups. Here you have two choices, either you can use the newly created VLAN ID details in CISCO UCS with any of the exiting VMware vSphere Port Groups or You can choose to create new Virtual Network Port Group VMware vSphere to associate newly created VLANs ID details.

Scenario:  We are running with a requirement to create a Seprate VLAN for IT Infra Servers. To achieve this requirement, we have to first create and configure the VLAN details in CISCO UCS Blade Chassis and after that we have to associate this VLAN details with newly created VMware Port Group which is created specifically for IT Infra Servers.

Prerequisites:
You must have a VLAN ID, VLAN subnet details, and VLAN Name already decided.
Make sure the VLAN is fully functional at switch level (check and confirm with your network team).
Admin rights or equivalent appropriate rights on CISCO UCS Infra and VMware Infra.


Steps (Configuring new VLANs in CISCO UCS Blade Chassis):

Login to CISCO UCS Blade Chassis using administrative credentials.


Navigate to LAN > VLANs > Right Click on VLANs > Click in Create VLANs


Give a suitable VLAN Name > Fill the VLAN ID number you received from your network Team > Click OK to save the changes


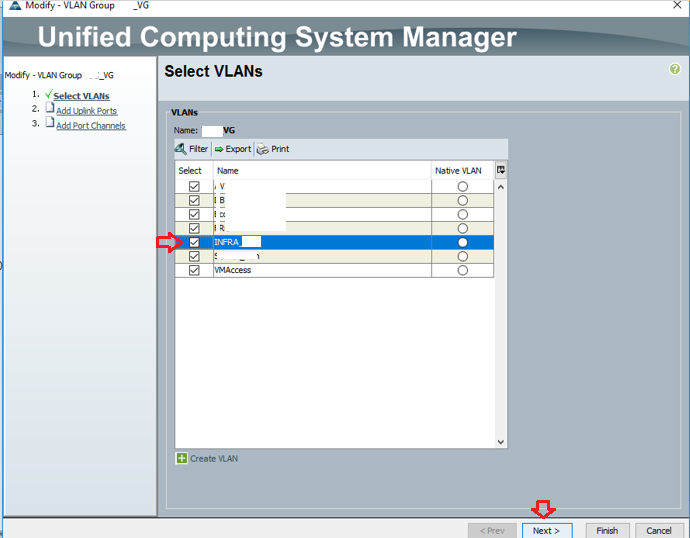
Now go to VLAN Groups > Select your VLAN Group > Click on Edit VLAN Group Members


Enable Check Mark on VLAN Name you had created in last step > Click Next > Click on Finish


Now, Go to Servers tab > Service Profiles > Select the Service Profile for any Blade Servers > Go to vNICs > Modify VLANs > Enable Check mark on the VLAN Name you created already > Click OK

Note: You have to repeat this step for All Service Profiles and each vNICs associated with these Service Profiles.


Steps (Creating Virtual Network Port Group in VMware vSphere):

Login to VMware vSphere Client with administrative access


Choose the ESXi Host > Go to Configuration tab > Networking > Properties


Click on Add


Select Virtual Machine > Click Next


Provide the suitable Network Label > Fill in the VLAN ID Click Next


Click Finish to close the wizard


Cheers, please write me back if you have any query or feedback on this.

How to read or convert SIDs in Active Directory?

Or, Converting SID to readable Name/Object (Group or User).
Or, Converting User Name to SID or Converting Group Name to SID in Active Directory environment and Vice-versa.

Descriptions: Whenever it comes to managing Active Directory, every administrator are encountered with this situation someday to read the SIDs which are not in human readable format.

E.g. You were investigating the root cause of access rights breach and you thought to verify who all are having permission on some specific directories. You are able to read the name of some users which are appearing in human readable format but some of them are appearing in SID format. What to do???

Yes, you must convert the SID to human readable format to read it and this Article explains, how to do it.

Note: In Some cases, you might not get the result of SID to name conversion. That means, the SID can be a stale entry and the user associated with that SID is already deleted from AD.

Steps (Converting user name to SID):
Open Windows PowerShell as Administrator (run as Administrator).


Run the below command, Replace Techies_Sphere with user name you want.
$Name = “Techies_Sphere”


Now, run the command below, and you are done.
(New-Object System.Security.Principal.NTAccount($Name)).Translate([System.Security.Principal.SecurityIdentifier]).value


Now you have the SID (S-1-5-21-688589536-1868229280-2673097225-1108) details which is of User ID Techies_Sphere.

Steps (Converting SID to User Name):
Open Windows PowerShell as Administrator (run as Administrator).


Run the below command, replace ‘S-1-5-21-688589536-1868229280-2673097225-1108’ with the SID ID of yours.
$Name = “S-1-5-21-688589536-1868229280-2673097225-1108”


Now run the below command and you are done.
(New-Object System.Security.Principal.SecurityIdentifier($Name)).Translate([System.Security.Principal.NTAccount]).value


Now you have the User ID details(Techies_Sphere) which is of SID(S-1-5-21-688589536-1868229280-2673097225-1108).

Cheers, please write me back if you have any query or feedback on this...

Thursday, 29 December 2016

How to delete a single email from all user’s mailboxes in O365 server?

Or, PowerShell command to delete a single email from all user’s mailboxes in Office365 server.
Or, Email sent by mistake to all users, want to delete the specific email from everyone’s mailbox.

Descriptions: This is very common scenario where someone in your organization sent an email by mistake to a ‘Distribution List’ which may contain 100-1000 or even more users. Now the role of administrator starts here.

The requirement here is to delete this particular email from every user’s mailbox without letting them know about this.

Take it easy, you can use below PowerShell command to get it done.

Steps:
Connect to office365 server PowerShell admin console with administrative privilege.
Run below command to delete the specific email.
-----------------------------------------------------------------------------------------------------------------------
$mailbox = Get-Mailbox  -ResultSize Unlimited
foreach ($Mbx in $mailbox) {
$sam = $mbx.SamAccountName
Search-Mailbox -Identity $sam -SearchQuery 'Subject:"your email subject line contents" AND From:"culprituser@domainname.com"' -DeleteContent -Force
}
-----------------------------------------------------------------------------------------------------------------------

Note: Please specify “From” user’s email address and “Subject” field very carefully. Else you will end up with criticism instead of appreciation. good luck.

Wednesday, 28 December 2016

How to collect SP diagnostic logs in EMC VNX5200 Block using storage admin console?

Or, How to perform SP Collects in EMC VNX5200 Block Storage?

Steps:
Once you are logged in to the storage admin console, click on Storage System Name hyperlink as reference shown below:


Click on System tab


In the Right side task pane, go to Diagnostic Files section > Click on Generate Diagnostic Files – SPA and Generate Diagnostic Files – SPB respectively.

Wait for 10-20 minutes to complete the SPA log collection process.


To get the logs saved on your local PC, click on Get Diagnostic Files – SPA and Diagnostic Files – SPB respectively and transfer the files on your local PC (reference screenshots and steps are given below).

Select the .zip file > If required change the Destination Directory to desired path > Click on Transfer


Click Yes to confirm.


Wait for the file transfer to be completed. Once the transfer is completed, Click OK to close the file transfer windows.


Cheers, write me back if you have any query or feedback..

Saturday, 24 December 2016

How to block external or internal emails for a specific user in Office365 Server?

Or, How to create email transport rule in Office365 server?

Descriptions: First thing first, there is no option in mailbox properties to restrict a specific user from sending email outside the organization if you are using Office365 online exchange server. This is one of worst limitation of Office365 server and mailboxes along with too many others. Yeah, there is way to achieve this requirement still.

To block the external emails for a specific user, you can create a transport rule. Be extra careful while creating this transport rule as it can impact more than you expect if created wrongly. 

If you are not much familiar with creating transport rules, my advice is to get in touch with MS Support guys and get it done in their supervision.

Steps:
Login to your Office 365 account.

Under Admin console choose Exchange.


Under Exchange admin centre (EAC), go to mail flow > rules


Click on the + sign > create a new rule


You can use any friendly and logical name for this rule > Click on ‘more options’ to see advanced options > carefully select the user and condition > Click on Save


Good Luck..

Saturday, 10 December 2016

Installing additional HDDs in exiting RAID5 storage pool of CISCO C240 Rack Server.

Or, How to extend exiting RAID5 storage pool in CISCO C240 Rack Server?

Descriptions/Scenario: This is very generic requirement that, sometime we may need to extend the exiting server’s drive space due to space crunch. If it’s a virtual machine, your life is easy but if it’s a hardware machine, you need to go with lots of things (purchase new HDDs, extend existing RAID space, wait for successful reconstruction completion, expand the logical drive associated with the RAID group you are extending etc..).

In my case, I have a CISCO C240 rack server where I have two RAID groups. RAID1 for OS and RAID5 with one hot-spare drive for data.

The RAID5 data drive in the OS is full and having no space. I have purchased some additional HDDs and inserted in empty slots of my CISCO Serer.


Lets see in below steps what else to be done.

Steps:
Login to CISCO Server management console (CIMC) and verify if all the hardware components are functional well without any error.


Select RAID5 pool > Click on Edit Virtual Drive


Click OK to confirm if prompted in the Pop-up window


Select RAID Level (5)


Select all the “Unconfigured Good” newly inserted drives > Click on Save Changes


The configuration process will be started now


Wait for reconstruction task to be completed (it may take longer).


Note: Please check if all the hardware components are working well. Here we got a Moderated Fault because of reconstruction job. Don’t worry, once the reconstruction will be completed, the fault will go away.

If there are other components which are showing fault status, you must take action on that with the help of CISCO Support guys.

Upon the successful completion of “Reconstruction” you can extend the disk from OS inside.