Sunday, 7 May 2017

How to update vCenter server appliance

Or, Update vCenter appliance 6.0 update 3a to 6.0 update 3b
Or, Upgrading vCenter server appliance

Descriptions: Updating vCenter server appliance is very easy if you are on vCenter server appliance version 6.0 and above. In vCenter server appliance you have two consoles one is vCenter server management console that you know as vSphere web client and another is vCenter server maintenance console that is also knows as root console.

To perform update of vCenter server appliance, you need to login with root credentials on maintenance or root console or Appliance Management User Interface of vCenter server appliance.

Prerequisites:
1. Root credentials of vCenter server appliance
2. At least 1 hrs of downtime of vCenter server
3. Basic knowledge of vCenter components
4. Internet connectivity on vCenter server appliance (required when checking for update online)
5. Appliance management user interface URL accessible https://<FQDN-or-IP>:5480

Steps: updating vCenter server appliance

Open Maintenance console of vCenter server (https://<FQDN-or-IP>:5480) > Login with root credentials


Go to Update option


Click on Check Updates (select check URL)


Wait for update check to be completed > Once updates are visible under Available Updates section > Click on Install Updates


Accept the license terms and condition > Click on Install


Wait for installation to be completed


Upon successful completion of updates installation, click OK


Now the reboot of vCenter server appliance will be initiated > Wait for reboot to be completed


Login back to maintenance console and verify the Update Version, it must have changed to the latest selected version you had selected while performing update


Cheers, Please write me back if you have any query or feedback.

Saturday, 22 April 2017

VMware vSphere Update Manager installation and integration with vCenter appliance

Or, vCenter appliance integration with update manager
Or, Update manager with vCenter appliance
Or, How to use update manager with vCenter appliance
Or, How to install update manager
Or, Enabling Update Manger client plugin for vSphere traditional client
Or, Enabling Update Manger client plugin for vSphere web client

Description: Friends, if you were using update manager on vCenter server with windows server operating system platform and now want to use it with vCenter appliance, or if you have installed vCenter appliance and now want to use update manager with this appliance, you may get all your answers here.

 Scenario: I have recently migrated from windows based vCenter server to vCenter appliance. Now I want to use Update Manager with this vCenter appliance but the challenge is, update manager cant’t be installed on vCenter appliance or Linux based OS, it can be installed on Windows based OS only.

There are two stages in this article, in Stage-1 we will see how to install update manager and integration of update manager with vCenter appliance. In Stage-2, we will be enabling update manager plugin for vSphere web client and vCenter traditional client.

Enabling client plugin on vSphere web client and vSphere traditional client is must because only after this, you would be able to get the Update Manager icon in your vSphere clients.

So now, I have my vCenter server running on vCenter appliance and going to install update manager on windows based operating system and while the installation of Update Manager, I will integrate it with vCenter appliance. Latter in stage-2, I will be enabling Update manager plugin with my vCenter server appliance using vSphere web client and vSphere traditional client.

Stage-1/Steps:  Installation and integration of Update Manager with vCenter appliance

Download the VMware vCenter Server ISO for Windows from MyVmware download portal ( In my case its, VMware vCenter Server 6.0 3a and module for Windows )


Mount the ISO on the Windows Machine (I am having Windows Server 2012 R2)


Right Click on Autorun executable file > Choose Run ad administrator


Click on Install


Wait for the Installation of SQL Express completion
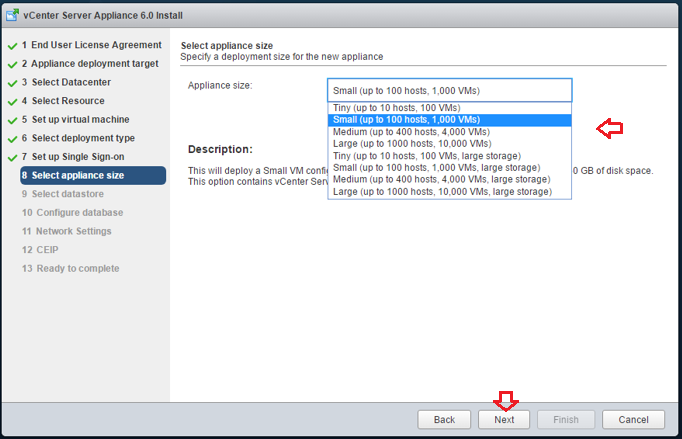


Click Next


Accept the license agreement terms > Click Next


Choose Download updates from default source immediately after installation > Click Next


Fill in all the required details/credentials of vCenter appliance server > Click Next (This is where you are integrating Update Manager with your existing vCenter server appliance)


Give IP or Name of the Update Manager server here > Click Next


If you have proxy server, fill in all the details or leave these fields blank > Click Next


Configure the Installation and Patch Repository directory > Click Next


Click on Install to proceed with the Installation


Wait for the installation to be completed


Click Finish


Now you are done with installation and integration of update manager with vCenter server appliance

Stage-2/Steps:  Enabling Update Manger client plugin for vSphere web client

Login to vSphere Web Client console > Go to Client Plug-ins > Click on Check for New plug-ins > VMware vSphere Update Manager plug-in will be installed


To be able to see the VMware vSphere Update Manager in vSphere Web Client you must have the View Compliance Status privilege.

Log off from the vSphere Web client console and login again > Go to admin Home page > you will be able to see Update Manager icon under monitoring section of the home page.


Steps: Enabling Update Manger client plugin for vSphere traditional client
                                
Login to vSphere traditional client > Go to Plug-ins menu > Click on Manage Plug-ins


See for the Available Plug-ins > Select VMware vSphere Update Manager > Click on Download and Install hyperlink


Click on OK when prompted


Click on Next


Click on I accept the terms in the license agreement > Click Next


Click on Install


Click on Finish


It’s all done now.

Cheers, please write me back if you have any query or feedback.

Skype and Skype for Business on Windows and Mac

Or, Difference between Skype and Skype for Business
Or, Add Skype contact in Skype for business app on Windows and Mac

Descriptions: If you are facing problem adding Skype contact in your Skype for business app on Mac OSX or want to know what factors you should be considering to understand architectural and functional differences between Skype and Skype for Business, you must read the guest post I have written on expert exchange forum to help one of the tech guy..

Reference Guest Post:

Reference Microsoft KB:


Cheers, please write me back if you have any query or feedback.

Tuesday, 18 April 2017

Windows 10 support end date announced, what’s the truth?

Or, Windows 10 expired? Facts must to know.
Or, Windows 10 end of life announced
Or, Support retired date for windows 10

Description: Guys, MS has announced the support end date for Windows 10 operating systems but its only for Windows 10 version 1507 build 10240 which is possibly the very first release of MS windows 10 operating systems.

So, if you are running on any latter version of Windows 10 operating system, you not need to worry about this announcement at all.

Windows 10 version 1703 is the most recent version of Windows 10 operating systems as on today (18th Apr 2017).

To answer all your queries about Windows 10 versions and builds expiry date, you may refer below two Microsoft articles...

Windows lifecycle fact sheet

Windows 10 release information

Cheers, Please write me back if you have any query or feedback.

Monday, 17 April 2017

Installing vCenter Server Appliance step by step instructions

Or, How to install vCenter appliance 6.0?
Or, vCenter server appliance 6.0 installation steps
Or, Installation and configuration of vCenter server appliance


Descriptions: VMware vCenter Server appliance is a step towards making you worry free with too many limitations, management challenges, and licensing, compare to windows based vCenter server, where you have to have a Windows Server, then vCenter installed on it, OS licenses, SQL licenses or SQL express with very less supported capacity of VM instances and ESXi hosts in a cluster etc..

Installation of vCenter server appliance is very easy compare to Windows based vCenter server installation. Yes, we are going to see the installation steps one by one in this article.

IMP Perquisites:
1. vCenter Server Appliance Setup ISO image (its VMware-VCSA-all-6.0.0-5202527.ISO in my case).
2. VMware Client Integration Plugin Installed on your local machines from where you are willing to initiate the installation
3. Administrative access of any of the ESXi host or old vCenter server if any
4. A New IP with all subnets details that you will be assigning to this vCenter appliance
5. DNS Servers Details

Note: Before proceeding with installation, you have to install client integration plugin on the local machine from where you are willing to initiate the installation or execute the setup file. Yes, you got it right… The installation will be executed from your local machine but it will install the appliance on any of the ESXi host or existing vCenter server that you will specify during installation. Let’s see how?

Steps: Installing VMware client integration plugin on local machine

Download the VMware Client Integration Plugin; it may look like below one:


Install this plugin on your local machine


Once the installation of this plugin is completed, you may proceed with vCenter appliance installation.

Steps: Installing vCenter Server Appliance

Right click on the ISO image you downloaded from VMware download centre > Click on Mount


Double click on vcsa-setup file to start the installation process


Click on Allow if prompted


Click in Install


Check on I accept the terms of the license agreement > Click Next


Select the Datacenter > Click Next


Provide required credentials and IP/Name details of your existing vCenter server or any of the ESXi host (in my case, I am using my existing vCenter Server IP and credentials)> Click on Next


Select any of the ESXi Host > Click Next


Provide Appliance Name and Root password details that you wish to have for new vCenter Server Appliance > Click Next


Select the deployment type you wish (in my case, I am going with “Install vCenter Server with an Embedded Platform Service Controller” option) > Click Next


Select Create a new SSO domain > Click Next


Provide all the required details and Click on Next


Select the Appliance Size as per your requirement


Select the Appliance Size and Click Next


Select the Datastore where you want to keep this Appliance > Click Next


Check on Use an embedded database (PostgreSQL) > Click Next


Fill in the required details and click Next


Click Next


Click on Finish to start the Installation


Wait for the installation to be completed, it may take approx. 30 minutes or more..


Installation completed, now you can access your vCenter server appliance with the URL given in the completion windows.


You can use user name as admnistrator@vsphere.local and password that you had specified while installation.

Want to know how to do initial configuration of vCenter server e.g. AD integration, SSO configurations ?? Please see my another Article vCenter server appliance AD integration and SSO configurations

Cheers, please write me back if you have any query of feedback.